# Web Push Quickstart: Firebase and Twilio Notify
> \[!CAUTION]
>
> Twilio deprecated Notify in October 2022 and no longer supports it. Learn more about [transitioning off Notify](https://support.twilio.com/hc/en-us/articles/11746930233115-Transitioning-off-Notify).
>
> If you're starting a new project, use [Programmable Messaging](/docs/messaging) for SMS notifications. For push notifications, integrate directly with platform-specific services such as APNs for iOS or FCM for Android. If you've already built on Notify, visit the [transition guide](https://support.twilio.com/hc/en-us/articles/11746930233115-Transitioning-off-Notify) to learn about your options.
With just a few lines of code and a couple of API keys, your application can set up Push Notifications using Twilio Notify, Google Firebase and your choice of web language. We have code for you to stand up a server in [C#](https://github.com/TwilioDevEd/sdk-starter-csharp), [Node.js](https://github.com/TwilioDevEd/sdk-starter-node), [PHP](https://github.com/TwilioDevEd/sdk-starter-php), [Python](https://github.com/TwilioDevEd/sdk-starter-python), [Ruby](https://github.com/TwilioDevEd/sdk-starter-ruby), and [Java](https://github.com/TwilioDevEd/sdk-starter-java).
In this Quickstart, you will:
1. Sign up for Twilio Notify
2. Create a Google Firebase Project and create credentials
3. Set up Notify with your credentials
4. Set up a sample "backend" server
5. Run a toy "frontend" server
6. Configure push notifications
7. Run the app and test push notifications
## Sign up for or sign into Twilio
Before you can send push notifications with Notify and Firebase, you'll need to [sign up for a Twilio account](https://www.twilio.com/try-twilio) or [sign into your existing account](https://www.twilio.com/console).
For now, that's about it - you'll need to set up an account with Firebase and get FCM credentials before you can move forward with the app. Leave the Twilio tab open and move to the next step.
## Create a project on Google Firebase
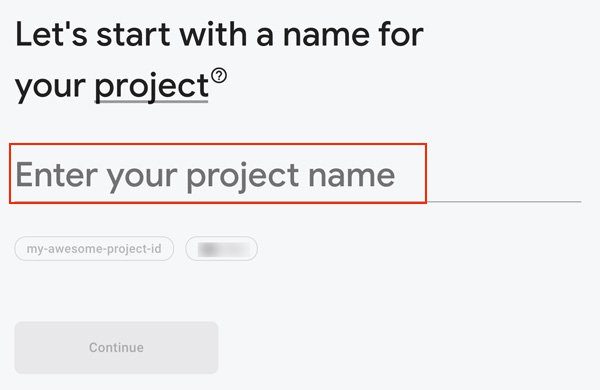
If you haven't yet, [sign up for Google's Firebase](https://console.firebase.google.com/). We'll be using it as the base for our notification today. To use push notifications for your web apps, create a project on the [Firebase Console](https://console.firebase.google.com/):
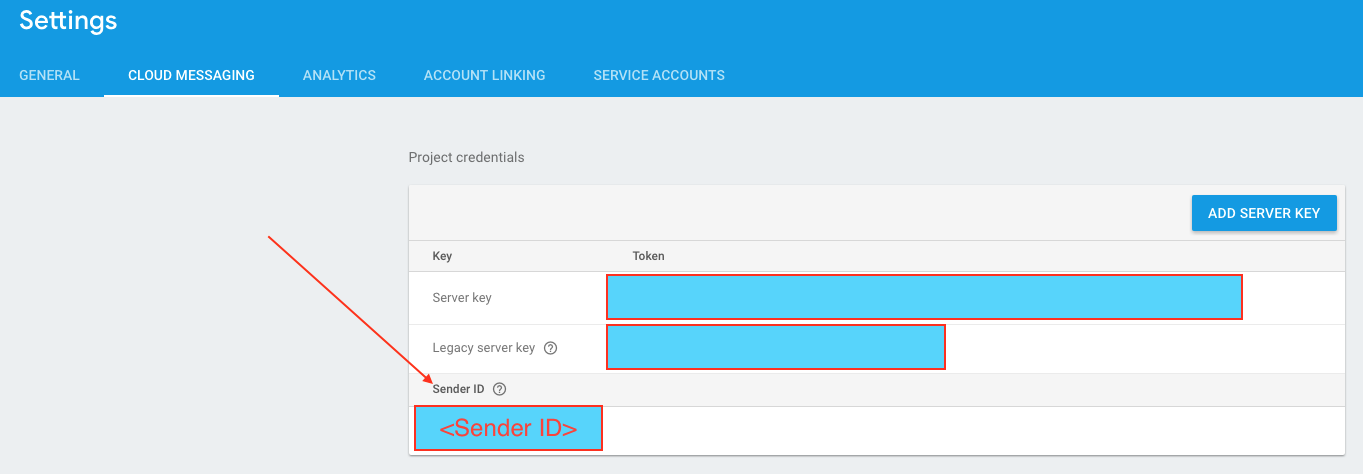
### Find your Firebase secret key
In Firebase, the FCM Secret is called the `Server Key` and you can find it in your Firebase console under your **Project Settings** and **Cloud Messaging** tab.

### Save your Firebase key with Twilio
Once you have the secret, you need to create a credential on the [Add a Push Credential](https://www.twilio.com/console/notify/credentials/create) page on the Twilio Console using the FCM Secret.
Give it a memorable name and paste the FCM Server Key into the *"FCM Push Credentials"* text box:

## Configure Notify
[In the Notify console, create a new Notify service](https://www.twilio.com/console/notify/services). Inside the new service in the **FCM Credential SID** dropdown, select the **Credential** that you have just created.
Make a note of the Service SID. You will use it later when you start writing code.

### Create Twilio API Keys
In order to authenticate your requests to Twilio API, you need to create a [API Key](https://www.twilio.com/console/runtime/api-keys). If you have already been using Twilio and have created API Keys, you can skip this step.
In Console, go to [https://www.twilio.com/console/runtime/api-keys](https://www.twilio.com/console/runtime/api-keys) and click the **Create API Key** button to create a new API key. Give your new key a **Friendly Name** and choose the "**Standard**" type. Hit the "Create API Key" button to generate the key.
The generated Secret is shown only ***once***, store it in a secure place. You will not be able to see the secret in the Console later. (If you do miss it, you can generate a new service).

### Gather your Twilio account information
Next, we need to grab all the necessary information from our Twilio account. Here's a list of what we'll need to gather:
| **CONFIG VALUE** | **DESCRIPTION** |
| --------------------------- | --------------------------------------------------------------------------------------------------------------------------------------------------------------------------------------------------------- |
| Notify Service Instance SID | A [service](/docs/notify/api/service-resource) instance where all the data for our application is stored and scoped. You can create one in the [console](https://www.twilio.com/console/notify/services). |
| Account SID | Used to authenticate REST API requests - [find it in the console here](https://www.twilio.com/user/account/settings). |
| API Key | Used to authenticate REST API requests - SID (SKxxx..). It can be found here: [https://www.twilio.com/console/runtime/api-keys/](https://www.twilio.com/console/runtime/api-keys/) |
| API Secret | Used to authenticate REST API requests. Hopefully, you stored it, but if not [create a new API Key here](https://www.twilio.com/console/runtime/api-keys/). |
## Set up the backend server
When using the Notify service, you need to *register* devices to receive notifications and then *send* notifications to those devices. To get you going quickly, we've created backend servers for the following languages:
* [C#](https://github.com/TwilioDevEd/sdk-starter-csharp)
* [Node.js](https://github.com/TwilioDevEd/sdk-starter-node)
* [PHP](https://github.com/TwilioDevEd/sdk-starter-php)
* [Python](https://github.com/TwilioDevEd/sdk-starter-python)
* [Ruby](https://github.com/TwilioDevEd/sdk-starter-ruby)
* [Java](https://github.com/TwilioDevEd/sdk-starter-java)
The sample mobile app is set up to communicate with the server-side app to register a device for notifications.
For this example, we'll use the **Node.js** server. Feel free to copy our choice or follow along in the language you prefer.
### Install Node.js
Follow the Node.js installation instructions [here](https://nodejs.org/en/download/) and complete the installation.
### Download the Node.js server app and unzip it
[Download the Node.js server app](https://github.com/TwilioDevEd/sdk-starter-node/archive/master.zip) and unzip it, or get it uncompressed from [GitHub](https://github.com/TwilioDevEd/sdk-starter-node)
### Configure and run the server app on your machine
Now that you have Node.js installed and the Node.js server downloaded and unpacked, it is time to configure the server with your specific account information.
1. Copy the `.env.example` file to `.env`
2. Next, edit the `.env` file to include the four configuration parameters (**Account SID**, **API Key SID**, **API Key Secret**, **Notify Service SID**) we [gathered from above](/docs/notify/quickstart/android).
### Notify Environment Configuration
Now we need to install our dependencies.
In a Terminal window, navigate to the folder where you unzipped or downloaded the app and run:
```bash
npm install
```
Once we've done configuring we're ready to start the server - again in your terminal, run:
```bash
npm start
```
To confirm the server is running, visit `http://localhost:3000` in your web browser. You should see the home screen, informing you of which Twilio services you've configured.

### Set up the Twilio Notify sample Web Push Notification app
#### Get the Twilio Notify sample Web Push app
To get you going quickly, we provide a Web Push sample app, available on [GitHub](https://github.com/TwilioDevEd/notify-quickstart-webpush).
#### Configure Web Push Notifications
The following steps will guide you to configure Web Push Notifications for the Twilio Notify sample Web Push app.
You'll need to collect the *Firebase Sender ID* and *Web API Key* and configure the demo app for your Firebase project. To obtain these keys, go to the [Firebase Console](https://console.firebase.google.com/) and open your **Project Settings**.
* Navigate to **General** tab. From here, copy the **Web API** Key:

* Navigate to **Cloud Messaging** tab and get the **Sender ID**:
* Use the obtained keys to modify 2 files in the project
**index.html:**
```html title="Firebase Push Notifications" description="Use Notify and Firebase to create push notifications"
Notify Firebase Cloud Notifications
```
**firebase-messaging-sw.js:**
```js title="Firebase Notify Integration" description="Initialize Firebase in JavaScript"
// !mark(10,11,12,13,9)
// firebase sample code snippets from https://firebase.google.com/docs/cloud-messaging/js/client
// [START initialize_firebase_in_sw]
// Give the service worker access to Firebase Messaging.
// Note that you can only use Firebase Messaging here, other Firebase libraries
// are not available in the service worker.
importScripts('https://www.gstatic.com/firebasejs/4.8.0/firebase-app.js');
importScripts('https://www.gstatic.com/firebasejs/4.8.0/firebase-messaging.js');
// Initialize the Firebase app in the service worker by passing in the
// messagingSenderId.
firebase.initializeApp({
'messagingSenderId': ''
});
// Retrieve an instance of Firebase Messaging so that it can handle background
// messages.
const messaging = firebase.messaging();
// [END initialize_firebase_in_sw]
messaging.setBackgroundMessageHandler(function(payload) {
console.log('[firebase-messaging-sw.js] Received background message ', payload);
// Customize notification here
const notificationTitle = 'Background Message Title';
const notificationOptions = {
body: 'Background Message body.'
};
return self.registration.showNotification(notificationTitle,
notificationOptions);
});
```
### Create a Binding for Web Push Notifications (FCM)
Next, we need to create a binding between an `Identity` and the browser using the web app. The `Identity` can be any unique identifier you choose, for example, a [GUID](https://en.wikipedia.org/wiki/Universally_unique_identifier). In this quickstart, we take care of that with the web push app. For more about *Identity* and *Bindings* visit the [Binding resource reference API](/docs/notify/api/binding-resource).
Refresh (or open) the Web Push App at `http://localhost:8000`.

If you are running the sample app in debugger mode and it wasn't successful, you'll see an error message printed in the console.
> \[!NOTE]
>
> **Note**: If you do not see a device token in the Address bar the first time you launch the app, reload the page. The demo app code is naive and doesn't handle the race between the App asking for and obtaining a token. Additionally, check the browser console for misconfiguration issues or hints.
> \[!WARNING]
>
> Notify uses Identity as the unique identifier of a user. Do not use directly identifying information (*personally identifiable information* or *PII*) such as a person's name, home address, email address, phone number, et cetera, as the `Identity`. The system that will process this attribute assumes it is not directly identifying information.
In the app enter the `Identity` you chose and click the button "Create Binding".
This action creates a *Binding* which uniquely identifies a user on a certain device running your application.
In the terminal window running the "backend" (Node.js) server, you should see something like this:
```bash
BindingInstance {
_version:
V1 {
_domain:
Notify {
twilio: [Object],
baseUrl: 'https://notify.twilio.com',
_v1: [Circular] },
_version: 'v1',
_credentials: undefined,
_services:
{ [Function: ServiceListInstance]
_version: [Circular],
_solution: {},
_uri: '/Services',
create: [Function: create],
each: [Function: each],
list: [Function: list],
page: [Function: page],
get: [Function: get] } },
sid: 'BSXXXXXXXXXXXXXXXXXXXXXXXXXXXXXXXX',
accountSid: 'ACXXXXXXXXXXXXXXXXXXXXXXXXXXXXXXXX,
serviceSid: 'ISXXXXXXXXXXXXXXXXXXXXXXXXXXXXXXXX,
dateCreated: 2017-01-17T13:07:39.000Z,
dateUpdated: 2017-01-17T13:07:39.000Z,
notificationProtocolVersion: '3',
endpoint: 'user9999999XXXXXXXXXXXXXXXXXXXXXXXXXXXXXXXXXXXXXXXXXXXXXXXXXXXXXXXXXXXXXXXX',
identity: 'Bob Builder',
bindingType: 'fcm',
address: 'XXXXXXXXXXXXXXXXXXXXXXXXXXXXXXXXXXXXXXXXXXXXXXXXXXXXXXXXXXXXXXXX',
tags: [],
url: 'https://notify.twilio.com/v1/Services/ISXXXXXXXXXXXXXXXXXXXXXXXXXXXXXXXX/Bindings/BSXXXXXXXXXXXXXXXXXXXXXXXXXXXXXXXX',
_context: undefined,
_solution:
{ serviceSid: 'ISXXXXXXXXXXXXXXXXXXXXXXXXXXXXXXXX',
sid: 'BSXXXXXXXXXXXXXXXXXXXXXXXXXXXXXXXX' } }
```
As you have the *Binding*, you're ready to send a Push Notification.
## Send a Push Notification to your App
To send a notification, you can use the Notify page on the "backend" service you have running at `http://localhost:3000`. Go ahead and click the "Notify" button at the bottom of the home page to go to the Notify page.
On this page, send a message to the identity you used in the app. Because you registered a binding with Twilio, the server sends your device the message as a notification.
You've got a "frontend" and a "backend" app which can send push notifications using Notify and Firebase, and you're ready to go off and build your own application. Let's build something amazing — notify us when you've got something.